Saturday, May 12, 2018

Ask Liz

As I become familiar with blogging I figure out what works and what doesn't. It's always a work in progress.

I've added a feature that I call "Ask Liz" and it allows you, the reader(s), to ask a question if you don't want to put a comment at the end of a post.

Ask Liz is a new feature to ask a question or suggest a post topic
If you have an idea of something you would like to learn more about, need to clarify something or have a question - send it through "Ask Liz." I'm always looking for ideas of things to post on and ways I can help share the excitement of doing research for family trees.

You can also follow the blog via email or through google by selecting the information below:

Follow Genealogy4Breakfast by email or google
I would love to hear what you would like to learn about. Feel free to leave a comment at the end of the post if you liked something, need more clarification or just to say hello!

Comments can be left at the end of a post
Thanks for stopping by and sharing your interest in family history with me!

Friday, May 11, 2018

RootsMagic - How to Use It

At the end of March I wrote a blog post about RootsMagic and how to download the software and import a file from Ancestry or FamilySearch. In this post I will walk through how to add people to your file(s) in RootsMagic using screenshots and explanations to help you create your own database for your research and information for genealogy. RootsMagic also has fantastic webinars, FAQs and downloads on how to use their software and they can be found here.

💎GENEALOGY GEM: When you start a new file for your research in RootsMagic you will need to name the file. I generally use the Surname of the line I am researching and use the month and year that I start the file. As I backup my file(s) each month I rename them according the month and year of the backup. This is helpful in the event of a computer crash for restoration purposes.

Drop Down Menu: Starting out we will look at the drop down menu buttons at the top of the RootsMagic (RM) file.

Drop Down Buttons in RootsMagic

File: Import, Export, FamilySearch Central, New file and Open file are all available under here
Edit: This deals with an individual and you can delete a person/fact, unlink a person or family and view LDS ordinances here
Lists: opens up various lists in RM such as addresses, sources, places, etc.
Add: allows you to add a parent, child or spouse to your file
View: you can view your pedigree or family here, other features such as descendants, people, websearch and timeline are available for full RM users.
Search: you can search for a person from an individual or family list
Reports: family group records, pedigree charts and other reports can be printed from this button
Tools: provides options to make your file unique by color coding people, search for problems and merge people among other features
Internet: TreeShare for Ancestry is located under this tab as well as look up FAQs, see latest news from RM as well as read message boards
Window: this allows you to decide the view of your files - vertical, horizontal or cascaded
Help: houses webinar links, tech supports, handouts and other support features

Image Buttons: These buttons are located directly below the drop down menu.

Image Buttons in RootsMagic
Paper creates a new file in RM
Folder opens an already created file or allows you to open multiple files
Person + allows you to add a person to your file
Person with pencil user can edit the highlighted person in their file
Printer allows you to select reports that you want to print
Books helps to create a family history book
Magnifying glass is a shortcut to search for a person in RM by name or record number
Tree is for users with the full RM program
Merge Sign is a shortcut to merge people in your file if duplicates are imported or created
Notebook is a shortcut to edit notes on the individual highlighted
Certificate allows you to look at sources for an individual, family or all sources at once
Camera allows access to media for the individual or all media in file
Envelope you can see addresses for the individual or all addresses in your file
Sticky Note allows users to create a to-do list for an individual, family or file
FamilySearch Tree opens FamilySearch Central which is the link to accessing FamilySearch through RM
Door is a logout button
Down Arrow allows user to edit image buttons by adding, removing or reordering buttons

Synopsis Box: This is a simple information box on the individual highlighted whether the user is in pedigree or family form of their file. You can see spouse(s), parents, LDS information as well as full name and vital information.

Synopsis Box in RootsMagic
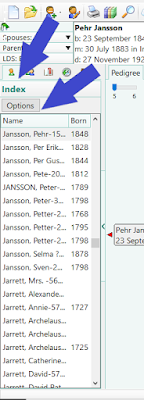
Index Column: is on the left side of the screen below the synopsis box. This is an index of all the people that are in the RM file that you are viewing.
RootsMagic Index
Options allows the user to add or remove information listed in the index but is limited to the following information: show alternate names (name is displayed with a blue + sign next to it indicating alternate name), show birth year (very helpful if you have a family line with the same or similar names in each generation) and show record number (displays the record number of the person in your file - unique just to that RM file).

💎GENEALOGY GEM: users can alternate the width of the column by hovering on the right edge of the index column and adjusting when the cursors changes to an adjustment symbol.

"Main Screen" View: The main section of the screen can be viewed as a pedigree or family chart for basic users. Full program users have more options which will not be discussed in this post as I only have the basic free version and am very happy with it.

Main View Options
Pedigree view shows the highlighted person and the direct line back with the option of viewing 5 or 6 generations at one time. You can maneuver backward and forward by clicking on the red arrows on the left and right of the main screen next to a person listed in your pedigree.
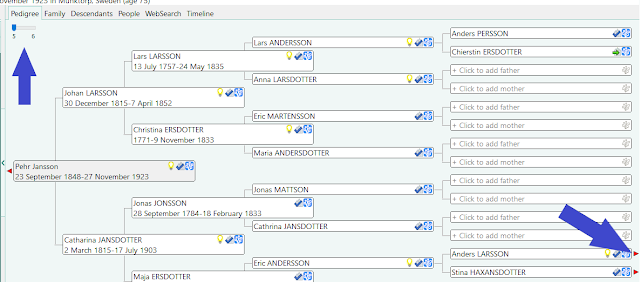
Users can select 5 or 6 generation viewing and maneuver through generations using red arrows
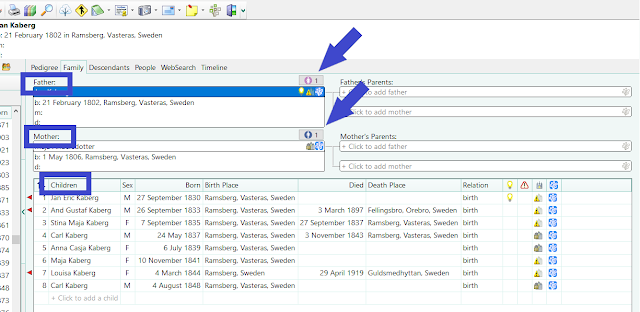
Family view shows the immediate family of the person highlighted in the index (husband, wife and children). Multiple spouses will show in the male/female icon next to the husband and wife. By selecting the gender icon a drop menu will allow the user to select which spouse and children are being viewed. Parents of both husband and wife are shown in the family view as well.
Family View of RootsMagic
TAKE NOTE: As with pedigree view, you can move through the family tree in family view as well by using the red arrows next to the father/mother/father's parents/mother's parents.

Descendants, People, WebSearch and Timeline are available through the full version and will not be discussed in this post.

Adding a Parent or Child to RM: As information and records reveal family members, the user can add family information by following the steps listed below.
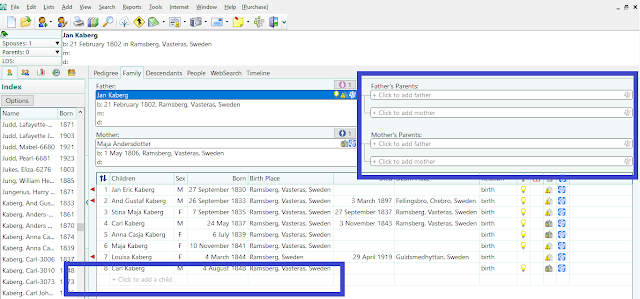
Select the appropriate relation box to add a person
Click on the box that pertains to the person that you want to add whether father, mother or child
If the person is NOT in your file you will click "Add NEW person"
If the person is already in your file but needs to be connected to a family click "select EXISTING person"

Adding a new or existing person to RM
Add a father - the surname is already autofilled but can be edited as needed
Add a mother - the surname will be blank if the father is not already filled in; always use the name before she was married
Add a child - the surname will autofill if the father's information is filled in but can be edited as needed
Add as much information as possible using birth/death date(s) and location using about/after/before if needed
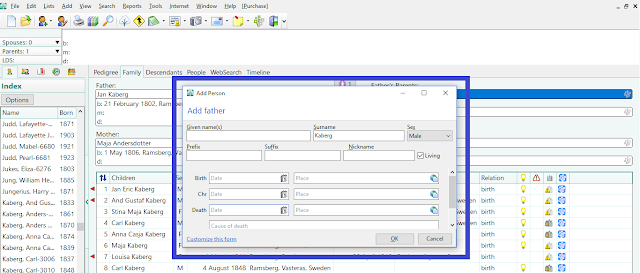
Add a Father

💎GENEALOGY GEM: users can customize the add person form by clicking on the blue hyperlink in the lower left corner of the Add Person screen. Click on "Customize this Form" and the user can add various life events and information to the Add Person form.

TAKE NOTE: once you customize the Add Person screen that information will be shown in every Add Person box

Editing a Person in RM: By double clicking on a name in the index, family or pedigree view a "profile" page will appear for the person you selected allowing you to add information regarding the individual chosen.
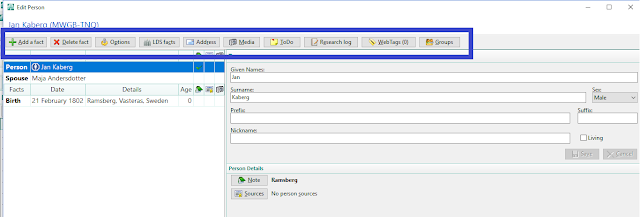
Edit Person Screen

In Edit Person mode users can:
Add a fact to a person such as christening, census information, military registration or service, education, occupation or social security number among other facts
Delete fact(s) about a person
View LDS ordinances for the individual if you have this feature enabled
View addresses for the person in their "profile" or select from a main list
View media attached to the individual or select from media file
Create and view a to-do list for the individual
You can add/view/delete notes specific to the person you are viewing
Attach/view/delete sources associated with life events for the individual

My best recommendation for those new to RM is to tinker around with it. Familiarize yourself with the buttons and learn by doing.

💎GENEALOGY GEM: Remember that trees from Ancestry and FamilySearch can be imported to your RM file!

Congratulations and happy tinkering! Now go have some fun!


Tuesday, May 8, 2018

FindAGrave Volunteering - A Great Way to Pay It Forward

Volunteers are a critical and valuable part of family history. Indexing is done by volunteers. Submitting your family tree, sources and photos is volunteering. Helping teach someone how to get started on their genealogy is volunteering. It is a key part of what makes this work roll forward and complete family puzzles.

In this post I'd like to make a plug for Find A Grave. This is a fantastic site that is what it is thanks to volunteers. If you haven't had a chance to check it out...go...now! You don't need an account to search and it's free!

Find A Grave homepage
Enter in what information you know about the person you are searching for. A last name is required to do a search. You can check the box(es) to include information such as nickname or maiden name as well as a partial surname search if you are unsure how the name was spelled.

TAKE NOTE: I generally leave birth and death dates blank in case I have incorrect information. If I know what state they died in I will include that - otherwise I start with the location blank and narrow it down from there.

Find A Grave Search 
In this case, I put in a general search for an ancestor in my tree. Originally there were 48 possible matches so I included the state that she lived in before she died.

Hulda's Headstone
I now have the name of the cemetery that Hulda is buried in as well as the exact location of the cemetery. If I were to visit, I would know to go to the Urn Garden. Thanks to a volunteer, there is a picture of the headstone for Hulda. I now also have information on Charles and Clarence as well as dates.

💎GENEALOGY GEM: If I came to this page and there wasn't a picture but I had one in my possession, I could add it to the website for others to see. If I wanted a picture of the headstone, I could click on "Request Photo" and it would be sent to volunteers in the area and they could "Claim" the request.

Uploading photos of your family members headstones and plots in a cemetery is a wonderful way to volunteer to other members of your family that may be searching for the same person you have information on. Thanks to many volunteers, people that are not able to get to cemeteries where their loved ones are buried can request photos to be taken so that they can see what the headstones or family plots look like.

By creating an account you can sign up to become a volunteer and take pictures for others searching for loved ones final places of rest. Going to get photos of a loved ones headstone? Take a moment to look up the cemetery to see if there are any photo requests for that cemetery.

TAKE NOTE: If you have location on your camera or phone that you are taking the photos with, this will input the GPS location of the headstone making it easier to locate should a family want to come see the headstone themselves.

With an account you are also able to transcribe photos that volunteers have submitted to Find A Grave making the database searchable.

If you are an avid photographer, looking for a way to pay it forward or just looking for a kind act to do...stop by your local cemetery and see if any photo requests have been placed. Thanks for paying it forward!


Monday, May 7, 2018

FindARecord.com

This is a great website if you only have a few minutes to do some family history. I love the color coding that goes along with it. It also syncs to your family tree on www.familysearch.org. Let's take a look at this great site that allows you to do some work on your genealogy in three minutes time!

FindARecord.com homepage
Click on the orange button and sign in with your FamilySearch account. It will send you to the FamilySearch sign in page to log you in to your tree.

Main page after log in
 The start person will automatically be you if you are the "start" of your tree on FamilySearch.

Who do you want to find has many options:
Ancestors searches for parents, grandparents and all great-grandparents
Descendants searches for children, grandchildren and great grandchildren
Ancestors and Descendants searches for the categories for Ancestors and Descendants
Cousins searches for Ancestors, Descendants as well as aunts, uncles, cousins, and all great-aunts, great-uncles and their children
Everyone searches for parents, grandparents, all great-grandparents, children, grandchildren, all great-grandchildren, aunts, uncles, all great-aunts, great-uncles, nieces and nephews, father-in-laws, mother-in-laws, sister-in-laws, brother-in-laws, and anyone else connected to your tree through blood or marriage.

💎GENEALOGY GEM: I generally start with ancestors and then work my way down as I clean up my tree.

Generation selection
 Generation selection allows you to choose how far back in your tree you want to search.

TAKE NOTE: If you feel overwhelmed then start with 1 generation and as you become more comfortable you can move up the numbers of generations you are viewing.

Now comes the fun part if you like organization and color coding as much as I do! Each field to work on is color coded on this website. We are going to look at each one in order. You can select one or two of the items to work on or all of them! That is one of the features I love about this website. You can pick one area to focus on and clean up your tree from there.

Sources selection box
Sources are very important in research for genealogy. This creates a trail and allows others to see where you found the information that you are documenting. FamilySearch is great at adding in record hints. If someone in your tree is missing a birth, marriage or death date/record or if FamilySearch has found a record hint - this is where it will show up! By selecting just sources you will only see the people in your tree that need this information or have a record hint mentioning them. Again, start small if you feel overwhelmed and work backwards! Start with death records and see what information you can collect to help you make sure you have the right marriage record, birth record, etc.

💎GENEALOGY GEM: Remember that genealogy works backwards so if you want to start small, only select death records and then move back to marriage records and then to birth. One step at a time to build your tree and follow your ancestors trail through life.

Person selects information on each individual
Person allows you to break down the person into details for each life event. This gives you a bigger pond to fish in but more specifically focused on each life event. It allows the person searching to start big and break down each event into smaller categories.

TAKE NOTE: Always start with the most recent life event (death) to find out what information you can use to help find clues and fill in gaps regarding the person you are researching.

Relationship helps clean up multiples and missing people
Relationship helps to identify possible problems in your tree such as multiple parents, missing parent(s), possible missing children and similar issues.

TAKE NOTE: some relationships didn't have children or may have had children that passed away at a young age and in between census records. Some spouses died in between census records so pay close attention to spouse names and ages - if things don't quite calculate right or suddenly the name changes, take a closer look to find any possible gaps.

Problems appear with a triangle an ! inside
 Problems "red flag" problems with dates or possible duplicates. If a child was born out of wedlock and then the parents married, it will be marked as a "problem." If dates were not put in correctly or transposed, it will be marked. If a father died before a child was born, it will flag. Some issues are a simple fix, others may need some research. Don't just change a date to fix it. Take a few minutes to find a record to support the information or verify the date. (See Sources)

💎GENEALOGY GEM: Some men died before their children were born, i.e. their wife was pregnant and then they died. If this occurred and a father died in 1845 and the child was born in early 1846, it will be flagged. Just make a note of the situation and move on.

Clean up helps make the person "complete"
Cleanup helps to do just that - cleanup a persons file in Family Tree. Each person needs one name, one marriage per spouse, character free names, etc. I refer to these people as "complete." Each place should, ideally, have a city/town, county, state and country. Dates are listed in DD MM YYYY format.

TAKE NOTE: A date or place may be "correct" but listed as needing a "standardized date/place". Simply back space one space and retype the number or letter you erased. Select the date or place from the drop down menu provided by FamilySearch. It will become highlighted in green and say "standardized place/date selected".

LDS Ordinances can be searched for and reserved
Ordinances can also be searched for with this website. You can select certain ordinances by checking the boxes next to the desired option(s).

TAKE NOTE: Before you print up any ordinances, always check for duplicates to make sure you are not repeating anything that may have already been completed.

In 3 minutes time you can standardize a place or date for a family member, merge duplicates, find a birth/marriage/death record, confirm a hint or add a source. Just like that! Have a few minutes? Go now to Find-A-Record and get started.


Tuesday, April 10, 2018

Web Indexing - A Great Way to Pay It Forward!

Have you heard of the indexing project on FamilySearch? Do you know what the indexing project is? It is a volunteer based project established and run by The Church of Jesus Christ of Latter-Day Saints that aims to make a digital index of scanned historical documents of all sorts from several languages and from countries all over the world. Volunteers are needed so let's take a look at what is involved and how to help out.

💎GENEALOGY GEM: Anybody that can create or already has an account on FamilySearch can participate in indexing.

💎GENEALOGY GEM: Indexing can be done from a computer or tablet. Unfortunately, the program cannot be supported on any type of mobile phone.

Volunteers "find a batch" to index from a beginner, intermediate or advanced level in English, Spanish or a variety of other languages. A batch can be indexed in 5-15 minutes depending on how many records are in each batch and how old the records are.

TAKE NOTE: A batch is anywhere from 1-10 scanned documents of a particular type such as birth, marriage or death records/indexes, immigration applications, etc. Volunteers transfer the information from the scanned image to a digital fillable form to make searching for records easier.

Two volunteers index the same batch of records. Once two volunteers have indexed and submitted a batch of records, a third person - known as an arbitrator - will review the batch that has been indexed and checks for any errors. Once the arbitrator has submitted the batch that has been review the records will be uploaded and searchable.

TAKE NOTE: An arbitrator is a third person that reviews a batch that has been indexed by two separate individuals and checks for any errors or discrepancies in what the volunteers have submitted.

A volunteer can "check out" a maximum of 10 batches of records at a time. After 7 days the records will be "returned" to the system for another volunteer to index. Types of records to be indexed are constantly changing which keeps it interesting and educational.

💎GENEALOGY GEM: If you can read or speak another language, please consider being an index volunteer. There is a great need and records are being added daily that need to be indexed!

Now that we have a basic foundation of what indexing is and what it involves, let's take a look at how to learn more about the project.

Go to FamilySearch and log in or create an account.

TAKE NOTE: Simple information is needed to create an account such as: a valid email address, name, etc. There is NO COST to create an account with FamilySearch.

Put your mouse over indexing and hover to show the drop down menu.

Log in to FamilySearch and click on Indexing or hover over it to produce the hidden menu

Click on the "OVERVIEW" button or click on the "INDEXING" button shown on the main frame.

Click on "OVERVIEW" or the "INDEXING" button
Click on "Learn More" to take an 8 step tour of indexing that will take you frame by frame through how to index a record.

TAKE NOTE: If you ever have any questions regarding indexing, you can select the "Overview" tab and review what steps you need to take.

Click on Learn More to take a frame by frame tour of indexing
FamilySearch has created an 8 step frame by frame break down of how to index a batch of records.

Click on "Try It Out" for an 8 step frame by frame how to on indexing
Click on "Start Tour" to take the FamilySearch Indexing Guided Tour.

Start indexing tour by clicking "Start Tour" button
The "Examine the Imagine" box will explain what the volunteer needs to do to complete indexing the batch. The "Project Instructions" box explains what information is in the batch that needs to be indexed by the volunteer.

Both boxes have instructions for the volunteer of needed information to move to the next screen and what information needs to be indexed.
TAKE NOTE: If you have any questions at any point in time while indexing, each box has a small purple ? that you can click on and it will help you gather the information needed to fill in the box. 

Once you have completed the tour you are ready to begin indexing. Click on the "Web Indexing" button and click "Find Batches" to select a batch to index.


Select the "Find Batches" button under "Web Indexing" to select a batch of records to index
A "Find Batches" screen will come up so we are going to look at all of the information in sections to break it down.
Find Batches Box broken down by sections
Difficulty Level - Indexing is broken down into three difficulty levels of beginning, intermediate and advanced.

💎GENEALOGY GEM: If you are just starting out with indexing, click the box next to "Beginning"

Location - If you would like to see if records are available in a particular location, you can type it in. Generally, I just leave this box blank.

Language - If you are fluent in reading and speaking another language, feel free to add it in here. Remember that batches are added daily so if you don't find something in that particular language, check back later and see if anything has come up.

💎GENEALOGY GEM: If you are just starting out, type in English in the language box.

Search - Click on "Search" after you have checked your difficulty box and language.

TAKE NOTE: A volunteer can "reserve" 1-10 batches at a time. You are given a 7 day period to index the information and submit it. If the batches are not completed in that time frame, the program will automatically release them to another volunteer to be completed.

Batches to Check Out - In the upper right hand corner of the "Find Batches" box you can reserve 1-10 batches at a time. The program automatically sets at 1 batch per reservation.

In the mainframe of the "Find Batches" box a list of batches that fit your criteria will be shown. For this example we are going to select the top result of "U.S. Wisconsin - Birth Records."

Type of record to be indexed and short explanation of privacy issues
Once a batch is selected, a brief explanation reminding you to follow instructions and respect the privacy of the information that you are indexing is always given at the beginning of each batch. 

💎GENEALOGY GEM: Some batches include recent events of people that may still be living - treat it as you would your own personal information. Respect their privacy.

2 Records are included in this batch to be indexed
Verify that the information on the 2 documents is different
Before advancing to the indexing screen you need to verify that the information is not duplicated, blank/damaged or doesn't pertain to the project. Select "YES" and click "NEXT IMAGE" and verify that the name is different than the first image or is readable and then click "NEXT IMAGE" to get started.

First fields of indexing the document
We know this is a certificate of birth as stated below the title of "Wisconsin State Board of Health" so we type "certificate" in the form type box.

AMENDMENT INDICATOR: The answer to this field is generally "NO" unless you see that information was crossed out or overwritten

The file number is almost always included in the upper right hand corner of the document. The numer before the hyphen do not need to included in the file number. (In this case 148- does not need to be included.)

We enter the child's name and surname as well as the birth date and time.

💎GENEALOGY GEM: Remember the SURNAME is the last name.

Adding time, gender and birth location from certificate
The time of birth, gender, whether multiple (single, twin or triplet) and location of birth including city or town, county and state.

Name of hospital and mother's information
The name of the hospital the child was born at is listed as well as information regarding the birth mother.

💎GENEALOGY GEM: For the mother her MAIDEN name is listed which is her name before she was married. If she is married, you then include her married last name for the current surname.

Information regarding the mother's residence and the father's information are indexed
Residence for the mother, on this record, is listed in the upper right hand corner. Information on the father is listed above the mother.

File date, birth weight and mother's marital status in recorded
TAKE NOTE: The file date is the day that the record was received by the local recorder. Do not record the any date that may be stamped on the upper portion of the document unless there is no information listed for the date it is received.

The birth weight and length are recorded together usually as well as the marital status of the mother.

Completing all fields on the record
TAKE NOTE: Any field that has an asterisk * after it is required information. If the field is blank, make note by holding down the control button and typing B.

Once all fields for the first record are completed, click on "Next Image" and repeat the steps listed above.

When both records have been indexed, you submit your batch
When both documents have been indexed, you click the "Submit Batch" button.

💎GENEALOGY GEM: Batches can have up to 10 documents to index in each batch. Some batches may only have one record.

Quality Check looks for any misspelled or unfamiliar terms
Quality Check looks for misspelled or unfamiliar words. In most cases, there aren't any errors to be corrected. If there is an error, simply correct it in the field box that comes up. If the marked error is spelled correctly just simply hit accept and it will move on. When you are finished, click "Submit Batch".

Congratulations! Confetti party for completion!
Congratulations and thank you for indexing! FamilySearch showers you with a digital confetti party for helping out with the indexing efforts. You are invited to index a similar batch - if any are available. If you downloaded more than one batch, you are invited to work on the next batch in your reserve. If you would like to try something new you can click "Find Batches" and it will take you back to the main screen to select a batch to work on.

💎GENEALOGY GEM: If you need to shut down the program or walk away from your batch the work that you have done will be saved and you can pick up where you left off.

Thank you for paying it forward and helping to create a digital index for another record!


Saturday, March 31, 2018

Recording Your Research

Genealogy is a lot of researching and perusing through records - whether in book or electronic format. It is important to document your research. For some it may help to make up your game plan before you start your research. For others it is easier to record it as you go. Regardless of how you decide to go about it...document it! Think of it as creating a bread trail for you to follow if you come across something that supports information you already have or reminds you of where you have already been.

TAKE NOTE: There are many different research forms out there and can overwhelm a newcomer. Remember to start small and wade into the water at whatever pace doesn't overwhelm you. Bookmark or write down sites that contain research forms you might be interested in and learn about them one at a time to see if they are right for you.

In this post we will be looking at a few examples of research forms that I have found helpful and provided a few links for websites that offer forms you can download and print. Many of the links will contain several forms and logs that you can select but I will only be focusing on a few of them. Feel free to learn about them as you go and see what works for you.

Examples of Research Logs:
Correspondence Log helps keep track of communication with anyone you have contacted regarding genealogy
Correspondence Logs are an excellent way of keeping track of any communication you have had regarding your genealogy. Cemeteries, funeral homes, county offices, libraries, historical societies or extended family - anyone that you have communicated with. It also allows you to include what information you have received. It's like creating your own personal family history phone book!
Library Research Checklist is very convenient for road trips to locate records and recording information found
 Library Research Checklists help keep track of information located at a specific location as well as a list of necessary supplies to bring. This form allows you to keep track of books that may provide insight into family members as well as noting what pages the information was listed on.

TAKE NOTE: You can also use the Library Research Checklist for books that are located online via Google or WorldCat.
Research Logs are helpful for keeping track of individual or family groups
 Research Logs allow for recording of date(s) information was found as well as the location (library, web, etc), source, information looked for/found and pages involved.
Newspaper Research Log tracks information gathered from newspapers
 Newspapers are an excellent place to get details regarding family events: births, engagements, marriages, milestone anniversaries and deaths/obituaries were often listed in newspapers. If you get lucky you may even get names of family that came from out of town to visit for the events!
Online Search Trackers help prevent researchers from visiting sites over and over for information they already have
 Online Search Trackers help researchers keep track of where they have already been and what they have learned from the site they have searched. With so many sources available on the web it is easy to get lost and not remember where you learned what...let alone where you have been! By using and online search tracker, you can glance over the sheet to see if you have already visited sites listed in your results from a search without wasting time on information you already have.
Research Checklist helps keep track of what stones you have unturned
Research Checklists are handy for keeping your research focused. On an individual level you can keep track of each type of record you have looked in for a particular ancestor and the date and location that you found them. It also provides helpful ideas of places to look for information that can help support other life events. For example - social security death index often lists at least a birth year for the deceased as well as the last residence. This information will help fine tune research for a birth certificate and you can check the last residence to see if an obituary was recorded in the local paper.

If you are clever with computers and what to create your own research log(s), here is a fantastic article from FamilyTree Magazine that is excellent on setting up a research log and walks you through it step by step on your computer:
Using A Genealogy Research Log
It also contains some helpful links at the bottom of the article.

Here are a few links to various research logs that are FREE to download:

Family Tree Templates and Forms - this site has an amazing variety of FREE forms, logs and trees that you can download for your personal use. You can also download a fillable form for a fee if you prefer the electronic route for storing all information. Browse the column on the left of your screen for even more break downs of various forms available.

FamilyTree Magazine Research Forms and Logs - while many of their forms are free for download, some do require users to provide an email address.

Ancestry Research Charts and Forms - while I try to keep most of my links to free sites, those of you that have an ancestry membership can use the charts and forms in this link for your research information. The selection is small and therefore will not overwhelm you.

Cyndi's List Printable Charts and Forms - provides several pages of various types of forms that you can use for your genealogy research and findings. Cyndi is excellent at letting users know which sites are free or require membership ($).

Try a few out and see what works for you. As always, comments and suggestions are welcome in the comment box. Happy Researching!